In this article today, we are going to show you how to install XEN dom0 on Almalinux 9 from source. This guide will also work for CentOS 8 and 9. XEN is a widely used hypervisor and has been around for many years. It has evolved to be a popular choice for server virtualisation and lowering the total cost of ownership.
XEN is a great choice if you are looking to virtualise your infrastructure, or you are looking to simply setup a home lab.
Whilst you can install XEN from Almalinux packages, often the case these packages are behind in versions. To get the latest releases and keep up to date we will focus on compiling XEN from source.
Tony Robbins
The only impossible journey is the one you never begin.
Requirements
- A server setup with Almalinux (fresh install recommended)
- Access to the internet
- You will need root access to the server
- The server should be a physical host, you can order one from Sebae
- SSH enabled on the server
Keeping your server up to date with releases and patches is highly recommended. As technology changes, so does the requirements to keep those changes secure. Running a virtualised environment puts the main hypervisor in the spotlight for attacks. We strongly advise to keep the hypervisor from being accessible from the internet and limit any access to virtual machines by firewalls.
You can follow our tutorial on how to configure automatic updates on CentOS and Almalinux.
Before You Begin
Login to your server as root and get the OS up to date.
dnf updatelet the process run, once finished Debian should be ready.
For our partition layout, we are using the following
/boot Ext4 - 500MB
/ Ext4 - 200GB
/swap - 2GB
LVM Volume for guests - 500GB
You do not need to follow our partition sizes, you can customise the partitions based your server specifications and requirements.
Step 1: Install Required Packages
Firstly, we need to enable the power tools repo by running the following command:
dnf config-manager --set-enabled powertoolsIn order to successfully compile the kernel and XEN, we will need to install the build packages. From the shell, run the following command:
dnf install wget glibc-devel python3 python3-devel gcc gettext patch glibc-devel glib2-devel acpica-tools flex bison uuid libuuid-devel ncurses-devel pixman-devel pixman yajl yajl-devel ninja-build openssl openssl-devel bc dwarvesDuring the install process, dnf will prompt to continue, if you are happy, please enter ‘Y‘.
We also need to run the following command:
dnf group install "Development Tools"You wiill get another prompt to continue, if you are happy please enter ‘Y‘.
Step 2: Download And Compile XEN
Now we have all the packages installed, we can download the latest build of XEN and compile it.
Let change into the source build directory by running the following command:
cd /usr/srcNow download XEN by running the following command:
wget https://downloads.xenproject.org/release/xen/4.19.1/xen-4.19.1.tar.gzNow extract the tar file:
tar xvf xen-4.19.1.tar.gzChange into the new XEN directory:
cd xen-4.19.1Now let’s configure the source files by running the following command:
./configure -enable-githttp -libdir=/usr/libOnce complete, we can now build the source, this may take some time.
make -j 5 xen && make -j 5 tools && make -j 5 stubdomLet’s install the newly compiled binaries, firstly change to the install directory with the following command:
cd dist/installNow we can copy the binaries into the appropriate directories.
Note ignore the error ‘cannot overwrite non-directory ‘/var/run’ with directory ‘var/run’
cp -R * /Edit the following file with your favorite editor, we will be using vi
vi /etc/sysconfig/xendomainsFind and comment out the following line then save the changes.
#XENDOMAINS_SAVE=/var/lib/xen/saveXen is now compiled and installed.
Step 3: System Tweaks
The following tweaks should make XEN start when the system boots up. These are optional but recommended. These tweaks will also add more scheduling weight to dom0 and disable power save on the console (useful if you get system crashes).
Note, the following entries that contain rc.5 could be rc.3 depending on your runlevel. We are running runlevel 5 so the following will reflect that. To find out what runlevel you are in, simply enter runlevel at the prompt.
root@almatraining:/usr/src/xen-4.19.1/dist/install# runlevel
N 3
Now enter the following commands:
ln -s /etc/init.d/xendomains /etc/rc0.d/S10xendomains
ln -s /etc/init.d/xendomains /etc/rc6.d/S10xendomains
ln -s /etc/init.d/xencommons /etc/rc3.d/S98xencommons
ln -s /etc/init.d/xendomains /etc/rc3.d/S98xendomains
ln -s /etc/xendom0caps /etc/rc3.d/S98xendom0caps
echo "xl sched-credit -d Domain-0 -w 512" > /etc/xendom0caps
chmod +x /etc/xendom0caps
echo "/usr/bin/setterm -powersave off -blank 0" > /etc/rc.local
Finally lets also disable ballooning, this can save RAM but with a performance impact. If you have a fast CPU then you may choose to ignore this:
vi /etc/xen/xl.confnow change the following line from auto to 0 and uncomment:
autoballoon=0Step 4: Configure Network Interfaces
Newer releases of XEN can now use the system bridge rather than in previously releases where XEN provided their own script. In order to do this, we need to use nmcli to edit the network configuration.
Caution is advised in the next step as this could lead to no network connectivity if the steps are not correctly followed.
Firstly, let’s find out what our interface is called, we can simply issue the following command to list the current configuration:
nmcli conn show --activeThe output should look similar to the following
[root@almatraining ~]# nmcli conn show --active
NAME           UUID                                  TYPE      DEVICE
enp9s0         2b502aca-07a4-413b-8ae5-02f29efd836f  ethernet    enp9s0
We can see here that enp9s0 is the main interface name on this server.
Now let’s create our new network bridge by running the following command:
nmcli conn add type bridge con-name xenbr0 ifname xenbr0Now add your IP to the new bridge, make sure you use your existing IP address. We are using 192.168.0.199/24 so we will add that to the config by running the following command:
nmcli conn modify xenbr0 ipv4.addresses 192.168.0.199/24Next add the gateway address to the bridge:
nmcli conn modify xenbr0 ipv4.gateway 192.168.0.1Now set the IP method to manual on the bridge:
nmcli conn modify xenbr0 ipv4.method manualWe now need to add the ethernet interface to the bridge by running the following command:
nmcli conn add type ethernet slave-type bridge con-name bridge-xenbr0 ifname enp9s0 master xenbr0Time to activate the new bridge, run the following command:
nmcli conn up xenbr0Now we need to deactivate the existing Ethernet or wired connection by running the following command:
nmcli conn down enp9s0The bridge setup is now complete, we can verify the active network connections by running the following:
nmcli conn show --activeThe output should look like the following:
NAME           UUID                                  TYPE      DEVICE
xenbr0         2b502aca-07a4-413b-8ae5-02f29efd836f  bridge    xenbr0
bridge-xenbr0  1b06f0f2-c7d0-49bd-9251-141adb62814a  ethernet  enp9s0
Note check your DNS resolver config is correct as we found ours was sometimes empty after creating a new bridge.
vi /etc/resolv.confAt this point if you need a drink, now is the time 🙂
Step 5: Compile The XEN Kernel
Now we have completed the XEN steps, we need to install a XEN enabled kernel. The XEN aware kernel contains the necessary drivers and options we need to start the hypervisor. This will also allow us to run more up to date kernels than the standard images shipped with Almalinux.
Let’s change back to the source directory;
cd /usr/srcNow let’s get the latest kernel release
wget https://cdn.kernel.org/pub/linux/kernel/v6.x/linux-6.12.5.tar.gzExtract the tar file:
tar xvf linux-6.12.5.tar.gzNow let’s change into the kernel directory:
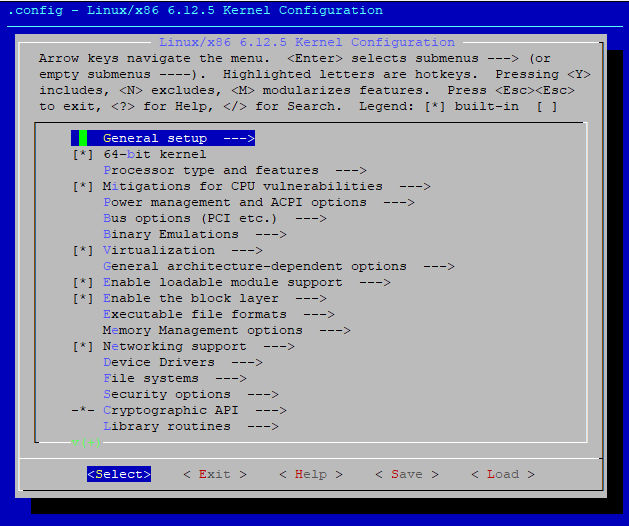
cd linux-6.12.5Now we will choose what to compile in the Linux kernel menu. Enter the following command:
make menuconfigOnce loaded, you should be presented with a text-based menu.
Go into the Processor type and features menu:
Then choose Linux guest support – all the options related to XEN should have an asterisk * next to them already, if not change it so they all have an asterisk. You can enable the debug options if you wish to.
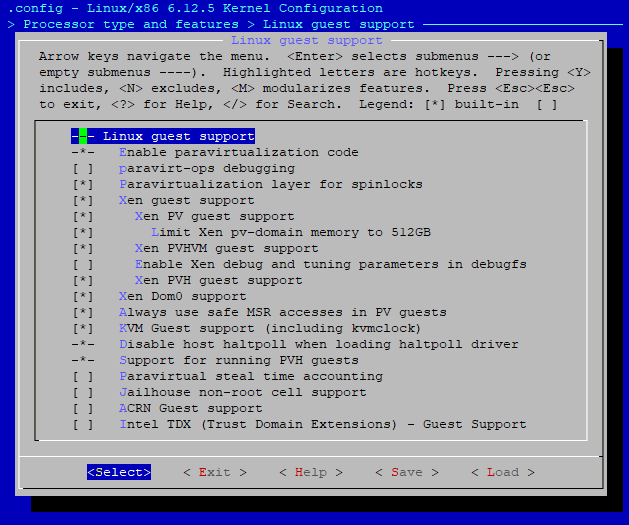
Now go back to the main menu by selecting exit, then exit again.
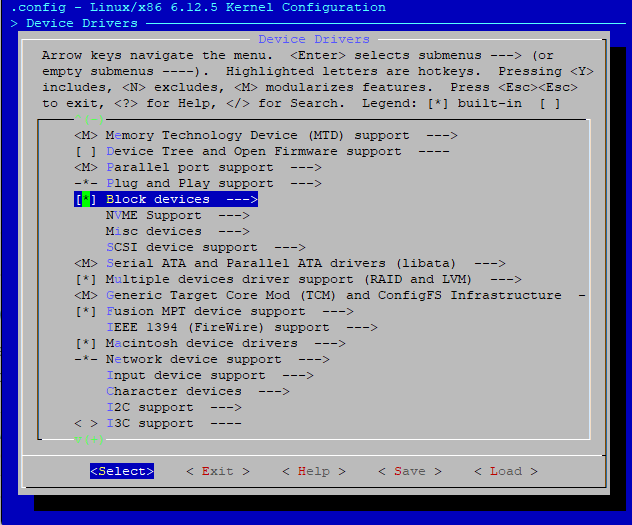
Now scroll down to Device Drivers and press enter
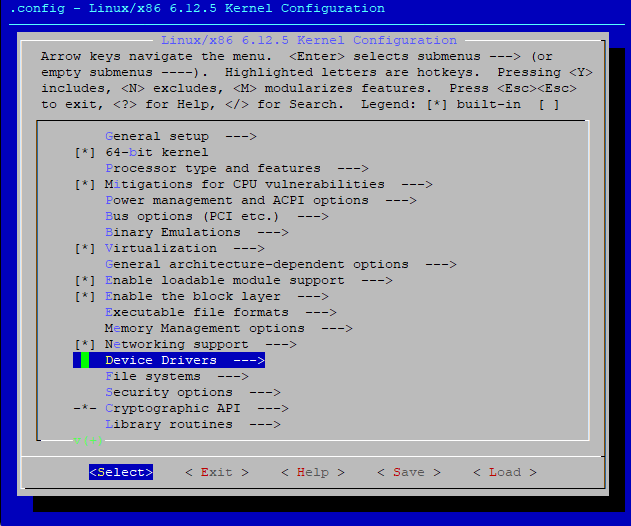
Next go down to XEN driver support and press enter
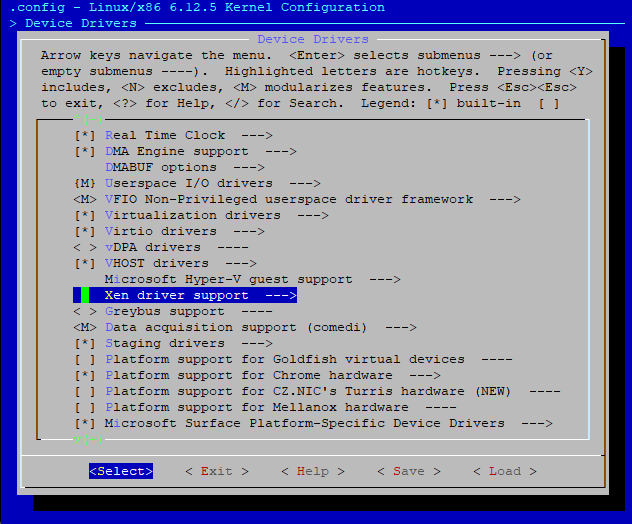
Most options should be either set to static (*) or module (M) if not you can change them all to static. Make sure the Backend driver support is enabled.
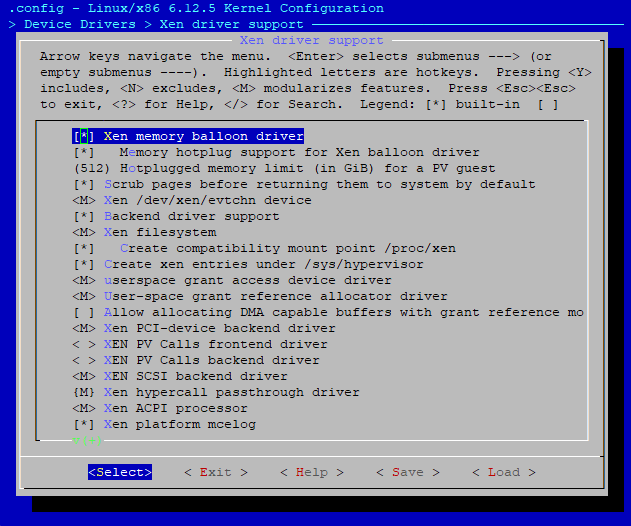
Now press Exit to get back to the Device Drivers menu.
Now go into the block devices menu
Make sure the 2 XEN options are set like below
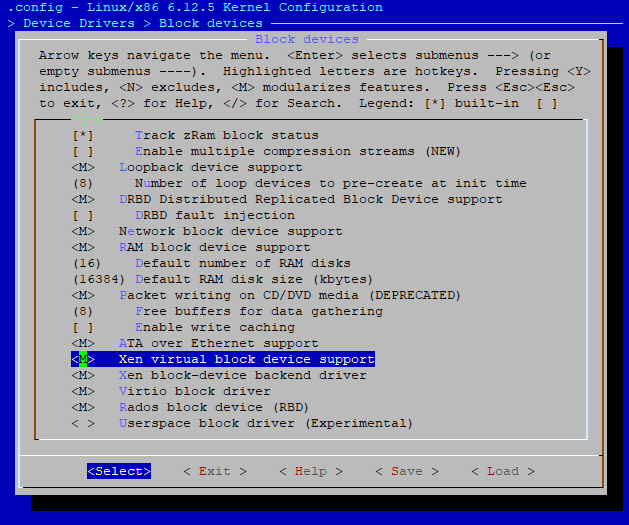
Now go back to the Devices Menu by pressing Exit.
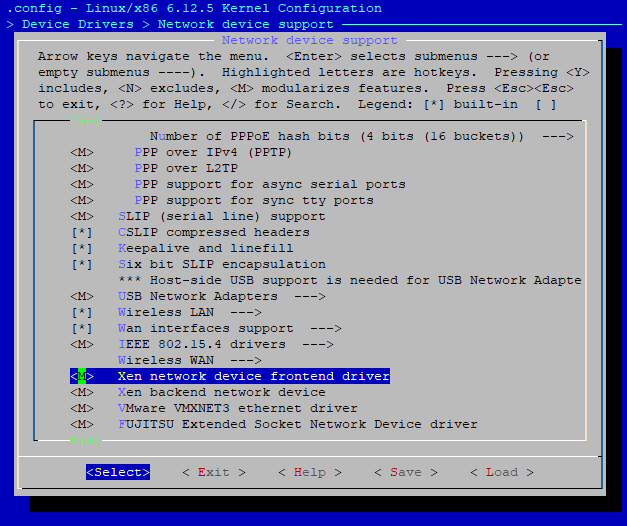
Go down to the Network device support menu and press enter
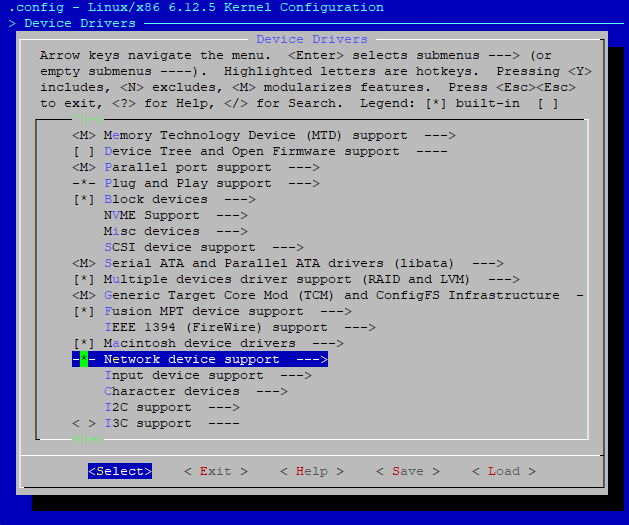
ensure the 2 XEN options are set statically (*) or set as a module (M)
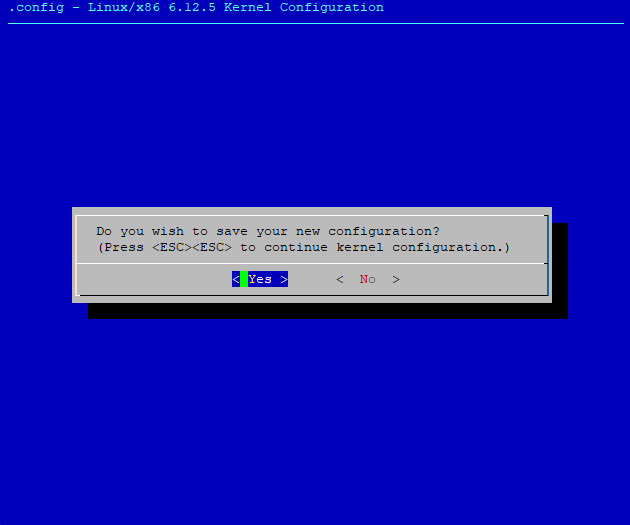
Thats it, we can now exit the kernel menu by selecting Exit 3 times.
Make sure to press yes to saving the changes
Note run the following command after you have saved the config to avoid a certificate error when compiling
sed -ri '/CONFIG_SYSTEM_TRUSTED_KEYS/s/=.+/=""/g' .configWe can verify our saved options by running the following command:
cat /usr/src/linux-6.12.5/.config | grep XENThe output should look like the following;
CONFIG_XEN=y
CONFIG_XEN_PV=y
CONFIG_XEN_512GB=y
CONFIG_XEN_PV_SMP=y
CONFIG_XEN_PV_DOM0=y
CONFIG_XEN_PVHVM=y
CONFIG_XEN_PVHVM_SMP=y
CONFIG_XEN_PVHVM_GUEST=y
CONFIG_XEN_SAVE_RESTORE=y
# CONFIG_XEN_DEBUG_FS is not set
CONFIG_XEN_PVH=y
CONFIG_XEN_DOM0=y
CONFIG_XEN_PV_MSR_SAFE=y
CONFIG_PCI_XEN=y
# CONFIG_KVM_XEN is not set
CONFIG_NET_9P_XEN=m
CONFIG_XEN_PCIDEV_FRONTEND=m
CONFIG_XEN_BLKDEV_FRONTEND=m
CONFIG_XEN_BLKDEV_BACKEND=m
CONFIG_XEN_SCSI_FRONTEND=m
CONFIG_NETXEN_NIC=m
CONFIG_XEN_NETDEV_FRONTEND=m
CONFIG_XEN_NETDEV_BACKEND=m
CONFIG_INPUT_XEN_KBDDEV_FRONTEND=y
CONFIG_HVC_XEN=y
CONFIG_HVC_XEN_FRONTEND=y
CONFIG_TCG_XEN=m
CONFIG_XEN_WDT=m
CONFIG_DRM_XEN=y
CONFIG_DRM_XEN_FRONTEND=m
CONFIG_XEN_FBDEV_FRONTEND=y
CONFIG_SND_XEN_FRONTEND=m
# CONFIG_USB_XEN_HCD is not set
CONFIG_XEN_BALLOON=y
CONFIG_XEN_BALLOON_MEMORY_HOTPLUG=y
CONFIG_XEN_MEMORY_HOTPLUG_LIMIT=512
CONFIG_XEN_SCRUB_PAGES_DEFAULT=y
CONFIG_XEN_DEV_EVTCHN=m
CONFIG_XEN_BACKEND=y
CONFIG_XENFS=m
CONFIG_XEN_COMPAT_XENFS=y
CONFIG_XEN_SYS_HYPERVISOR=y
CONFIG_XEN_XENBUS_FRONTEND=y
CONFIG_XEN_GNTDEV=m
CONFIG_XEN_GRANT_DEV_ALLOC=m
# CONFIG_XEN_GRANT_DMA_ALLOC is not set
CONFIG_SWIOTLB_XEN=y
CONFIG_XEN_PCI_STUB=y
CONFIG_XEN_PCIDEV_BACKEND=m
CONFIG_XEN_PVCALLS_FRONTEND=m
CONFIG_XEN_PVCALLS_BACKEND=m
CONFIG_XEN_SCSI_BACKEND=m
CONFIG_XEN_PRIVCMD=m
CONFIG_XEN_PRIVCMD_EVENTFD=y
CONFIG_XEN_ACPI_PROCESSOR=m
CONFIG_XEN_MCE_LOG=y
CONFIG_XEN_HAVE_PVMMU=y
CONFIG_XEN_EFI=y
CONFIG_XEN_AUTO_XLATE=y
CONFIG_XEN_ACPI=y
CONFIG_XEN_SYMS=y
CONFIG_XEN_HAVE_VPMU=y
CONFIG_XEN_FRONT_PGDIR_SHBUF=m
CONFIG_XEN_UNPOPULATED_ALLOC=y
CONFIG_XEN_GRANT_DMA_OPS=y
CONFIG_XEN_VIRTIO=y
# CONFIG_XEN_VIRTIO_FORCE_GRANT is not set
Now we can start compiling the kernel with the XEN options included.
Run the following command to start compiling:
make -j 5 bzImage && make -j 5 modules && make -j 5 INSTALL_MOD_STRIP=1 modules_installOnce complete, we can then copy the kernel files into the correct directories by running the following commands;
cp -a arch/x86/boot/bzImage /boot/vmlinuz-6.12.5
cp -a System.map /boot/System.map-6.12.5
cp -a .config /boot/config-6.12.5
depmod -a
mkinitrd -f -v /boot/initrd.img-6.12.5 6.12.5
Step 6: Configure Grub to boot XEN
We have reached the last part of the build. We now need to tell grub to boot in XEN mode and here we can also specify the RAM allocation to dom0.
change into the grub directory:
cd /etc/grub.dWe now need to move the normal Linux kernel to a lower priority so Grub boots XEN, run the following command:
mv 10_linux 50_linuxNext edit the grub file
vi /etc/default/grubNow we need to add the following lines under the GRUB_CMDLINE_Linux section.
You can also edit the RAM allocation, here we have it set to 1GB.
GRUB_CMDLINE_XEN_DEFAULT=dom0_mem=1024M,max:1024M
GRUB_CMDLINE_XEN=
The lines should look similar to this
GRUB_TIMEOUT=5
GRUB_DISTRIBUTOR="$(sed 's, release .*$,,g' /etc/system-release)"
GRUB_DEFAULT=saved
GRUB_DISABLE_SUBMENU=true
GRUB_TERMINAL_OUTPUT="console"
GRUB_CMDLINE_LINUX="crashkernel=auto resume=/dev/mapper/almalinux-swap rd.lvm.lv=almalinux/root rd.lvm.lv=almalinux/swap"
GRUB_CMDLINE_XEN_DEFAULT=dom0_mem=1024M,max:1024M
GRUB_CMDLINE_XEN=
GRUB_DISABLE_RECOVERY="true"
GRUB_ENABLE_BLSCFG=false
save and exit.
Next issue the following command:
grub2-mkconfig -o /boot/grub2/grub.cfgWe have found that the environment variable LD_LIBRARY_PATH needs to also be set in order for XEN to locate the required libraries. In order to do this, edit the following file:
vi /etc/ld.so.confNow add the following line to the file
/usr/libIt will look similar to this:
include ld.so.conf.d/*.conf
/usr/lib
Now save the file and exit.
Issue the following command which will set the environment variable:
ldconfigNow reboot and you should be able to issue the following command once you have logged back in;
xl listYou should get the following output:
Name                                        ID   Mem VCPUs      State   Time(s)
Domain-0                                     0  1024     2     r-----      16.7
root@almatraining:~#
You can now create your guest VM disks and config files, please refer to the XEN Project Wiki which contains useful information on settings these up.
Now you have learned how to install XEN dom0 on Almalinux from source.
We hope you found this useful, for any further help or interest in our products, you can contact us via our website.