Exchange 2013 Servers and higher are now taking up more space on our Windows Servers, this is because the logs it generates are increasing. For an administrator to clean up Exchange server logs manually, can be very time consuming.
To combat this we need a script to help keep our Exchange Servers functioning. The logs are safe to remove, and will not impact the operation of Exchange, in fact it is recommended to remove them.
Logs are useful for diagnosing issues and checking for actions performed by the server. The problem with Exchange is, these logs can be generated very quickly and before long, your server has suddenly run out of disk space. IIS logs in particular can generate lots of entries with clients connecting with Outlook Anywhere or OWA.
Customers choose to move to our Hosted Exchange to remove the overhead of maintaining their own Exchange enviornment. Log files in particular can be a tedious job to manage.
The script was originally found on Microsoft Technet.
Edit The Exchange Server Clean Up Script
Copy the following script into notepad. Save it somewhere on the Exchange Server as CleanLogs.ps1. Most people use a folder on the c:\ drive called scripts.
$days=3
$IISLogPath="C:\inetpub\logs\LogFiles\"
$ExchangeLoggingPath="C:\Program Files\Microsoft\Exchange Server\V15\Logging\"
$ETLLoggingPath="C:\Program Files\Microsoft\Exchange Server\V15\Bin\Search\Ceres\Diagnostics\ETLTraces\"
$ETLLoggingPath2="C:\Program Files\Microsoft\Exchange Server\V15\Bin\Search\Ceres\Diagnostics\Logs"
$ETLLoggingPath3="C:\Program Files\Microsoft\Exchange Server\V15\FIP-FS\Data\ProgramLogArchive\"
$ETLLoggingPath4="C:\Program Files\Microsoft\Exchange Server\V15\TransportRoles\Logs\FrontEnd\Connectivity"
$HTTPERRLoggingPath="C:\Windows\System32\LogFiles\HTTPERR"
Function CleanLogfiles($TargetFolder)
{
  write-host -debug -ForegroundColor Yellow -BackgroundColor Cyan $TargetFolder

    if (Test-Path $TargetFolder) {
        $Now = Get-Date
        $LastWrite = $Now.AddDays(-$days)
        $Files = Get-ChildItem $TargetFolder -Recurse | Where-Object {$_.Name -like "*.log" -or $_.Name -like "*.blg" -or $_.Name -like "*.etl"}  | where {$_.lastWriteTime -le "$lastwrite"} | Select-Object FullName
        foreach ($File in $Files)
            {
               $FullFileName = $File.FullName
               Write-Host "Deleting file $FullFileName" -ForegroundColor "yellow";
                Remove-Item $FullFileName -ErrorAction SilentlyContinue | out-null
            }
       }
Else {
    Write-Host "The folder $TargetFolder doesn't exist! Check the folder path!" -ForegroundColor "red"
    }
}
CleanLogfiles($IISLogPath)
CleanLogfiles($ExchangeLoggingPath)
CleanLogfiles($ETLLoggingPath)
CleanLogfiles($ETLLoggingPath2)
CleanLogfiles($ETLLoggingPath3)
CleanLogfiles($ETLLoggingPath4)
CleanLogfiles($HTTPERRLoggingPath)
Change the line that says $days=3 to what you prefer. The setting means that it will clean up the logs that are older than 3 days.
If any of the paths shown are different on your server, then also change these. By default Exchange will install to those directories, in most cases you do not need to change anything.
Once you are happy with the settings, save the file.
Run The Clean Up Exchange Server Logs Script
This is where we can now watch the c:\ drive disk space increase, in a lot of cases, drastically. We were working with a customer who managed to free up 500GB of logs!
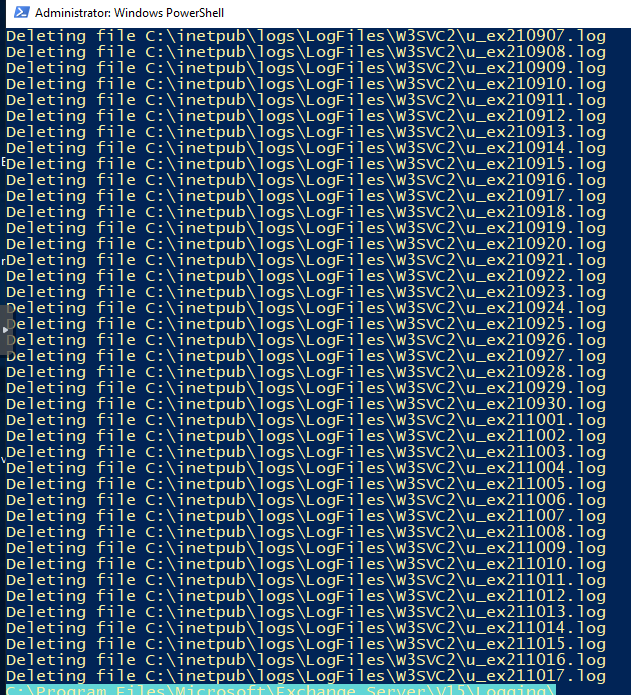
Right click on the CleanLogs.ps1 script, and choose Run with PowerShell. You will then be prompted to accept the policy change, choose ‘Y‘

You should then see all the logs being purged from the Server. Sit back as this may take some time depending on the amount of logs there are.
Now take a look at the size of the C:\ drive after the script has finished. Hopefully you should have some space freed up.
Automate The Exchange Server Clean Up Script
If you want to run the script on a regular basis, then we suggest you create a new account, for example svc_cleanlogs and give the account permissions to the folders where it will be deleteing the logs from:
C:\inetpub\logs\LogFiles\
C:\Program Files\Microsoft\Exchange Server\V15\Logging\
C:\Program Files\Microsoft\Exchange Server\V15\Bin\Search\Ceres\Diagnostics\ETLTraces\
C:\Program Files\Microsoft\Exchange Server\V15\Bin\Search\Ceres\Diagnostics\Logs\
Use Task Scheduler to create a new job which will should run daily. This will ensure you have the maximum amount of disk space available. Choose the new account your created or use the SYSTEM account, and tick the box to run with the highest privleges.

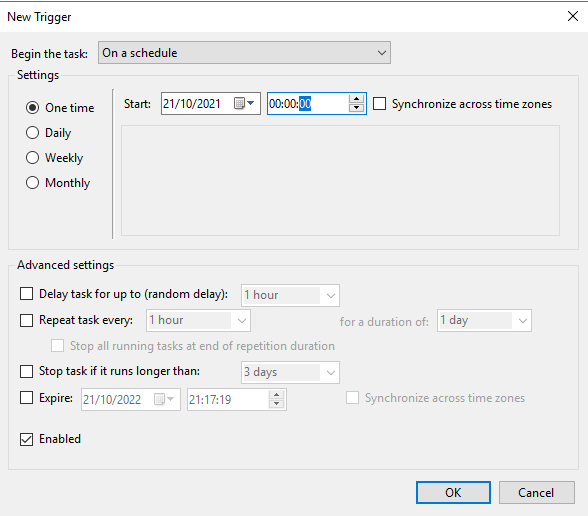
Click on Triggers, click new, and use On a schedule, then select Daily and set the time you wish the script to run.
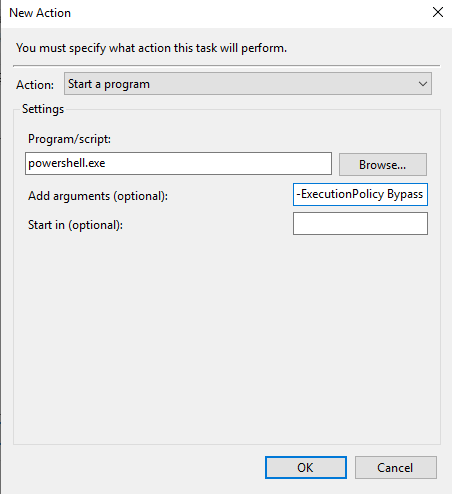
Choose ok to save the schedule. Then click on actions, select new. The action to choose is Start a program, then in the Program/script field enter
powershell.exe
In the Add arguments (optional) field enter
-ExecutionPolicy Bypass C:\Scripts\CleanLogs.ps1
Now click ok, and close the Create Task window. The task is now set to run.
Test The Scheduled Task
Click on the new task and select run from the right hand pane, if the job completes successfully, it will be indicated in the Last Run Result column with “The operation completed successfully. (0x0)“.
Review the log directories to ensure the log files are clearing out as expected.
Now we have the script running on a schedule, it will clean up Exchange Server logs daily and keep the disk space in good order.