Zabbix is an open-source monitoring platform used by thousands of organisations all over the globe. It is used to monitor servers, network devices, applications, services and cloud resources. If it has an IP, you can monitor it. If your not already monitoring your systems, or thinking of changing to something different, then follow this quick guide and learn how to install Zabbix on Debian 11.
The definition of insanity is doing the same thing over and over again and expecting different results.
Albert Einstein
Requirements To Install Zabbix On Debian 11
- Debian 11 minimal install
- Root access to the server
- Access to the internet
- SSH enabled on the server
This tutorial shows how to install and configure the latest release of Zabbix (currently 6) on a Debian 11 host, using MariaDB, PHP and Apache Web Server as the main components. New versions are released on a regular basis so please check at the Zabbix website for latest release.
If you would like to install Zabbix on Debian 11, you can order a Virtual Private Server from Sebae, which will be available for use within minutes.
For more information on Debian you can visit their official website.
You can also follow this guide in the following video.
Before You Begin
Login to your server as root and get the OS up to date.
apt update && apt upgradelet the process run, once finished Debian should be ready.
Step 1: Installing Apache Web Server and PHP Packages
To install Zabbix, first you need to download and install Apache, PHP and some required PHP modules as follows.
apt install apache2 apache2-bin apache2-data apache2-utils libapache2-mod-php libapache2-mod-php7.4 libapr1 libaprutil1 libaprutil1-dbd-sqlite3 libaprutil1-ldap libcurl4 libgd3 liblua5.3-0 libonig5 libsodium23 libxpm4 libxslt1.1 php php-bcmath php-common php-gd php-ldap php-mbstring php-mysql php-xml php7.4 php7.4-bcmath php7.4-cli php7.4-common php7.4-gd php7.4-json php7.4-ldap php7.4-mbstring php7.4-mysql php7.4-opcache php7.4-readline php7.4-xml ssl-certDuring the install process, the installer triggers systemd to automatically start the services once they have fully completed installing. The installers also sets them to start up automatically when the system is booted. You can check if Apache is running by running the follwing command.
# systemctl status apache2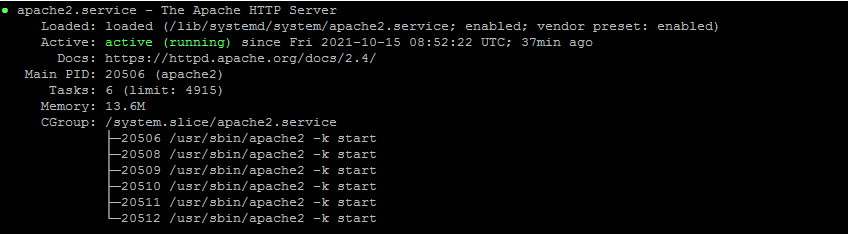
The following commands are useful for stopping/starting Apache whilst the system is running. If you make any changes you should restart Apache after.
# systemctl start apache2
# systemctl stop apache2
# systemctl restart apache2
Step 2: Install MariaDB Server and Client
Next, we need to download and install MariaDB to store all the Zabbix data on. MariaDB replaces MySQL in current Debian distributions.
apt install mariadb-server mariadb-clientWhen the MariaDB installtion is complete, the service is started and also set to start on reboot. To check the service is running, issue the following command.
systemctl status mariadb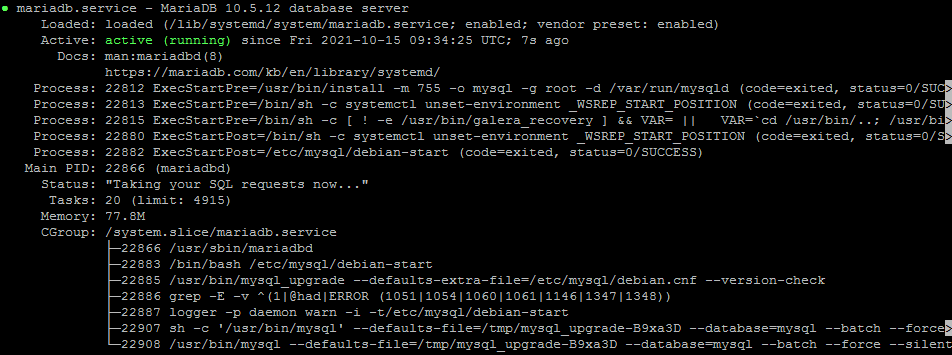
Next, we need to secure the MariaDB installation. The Debian package provides a script which you should run and apply the appropriate settings for your environment.
# mysql_secure_installationIt will prompt you for actions, such as removing anonymous users, disabling root access from the network and removing the test database. Apply all the changes.
Once you have secured the MariaDB installation, we need to create the Zabbix database. First login to MariaDB using the root account.
# mysql -u root -pNow issue the following commands, ensure your also set a secure password. This password will be used when configuring the Zabbix front end web page.
Replace mypassword with your own.
MariaDB [(none)]> create database zabbix character set utf8 collate utf8_bin;
MariaDB [(none)]> grant all privileges on zabbix.* to zabbix@localhost identified by 'mypassword';
MariaDB [(none)]> set global log_bin_trust_function_creators = 1;
MariaDB [(none)]> quit;
Step 3: Installing Zabbix on Debian 11
To install Zabbix, we need to enable the correct Zabbix Repository, then download the package.
# wget https://repo.zabbix.com/zabbix/6.3/debian/pool/main/z/zabbix-release/zabbix-release_6.3-1+debian11_all.deb
# dpkg -i zabbix-release_6.3-1+debian11_all.deb
# apt update
Now lets install the Zabbix server, web frontend (GUI) and the agents using the following command.
# apt install zabbix-server-mysql zabbix-frontend-php zabbix-apache-conf zabbix-sql-scripts zabbix-agentIf the installation was successful, lets now import the database schema and data into the new Zabbix database which you have just created.
Replace mypassword with the one you set in the previous database step.
# zcat /usr/share/zabbix-sql-scripts/mysql/server.sql.gz | mysql --default-character-set=utf8mb4 -uzabbix -p'mypassword' zabbixNext, we need to configure the Zabbix server to use the new database you just imported the data into, edit the following file.
vi /etc/zabbix/zabbix_server.confLook for the following lines and update their values to the ones that match your new database. You should only have to edit DBPassword=, the others should already be set by default.
Note remember to uncomment by removing the # value
DBHost=localhost
DBName=zabbix
DBUser=zabbix
DBPassword=mypassword
Save the changes and close the file.
Now lets restart Apache server to apply the new changes.
# systemctl restart apache2Now you have configured the environment, you can now start the Zabbix server. The services should already be set to automatically start on reboot.
# systemctl start zabbix-server zabbix-agentStep 4: Configure Zabbix frontend
You can now connect to the Zabbix frontend and finish the installation process. The DB settings should already be mostly populated, just enter the DB password.
Connect to your newly installed Zabbix frontend: http://server_ip_or_name/zabbix
User Admin
Password zabbix
Now Zabbix is installed, you can move the interface so its accessible via an SSL certificate. Follow the guide (from step 3) How To Install Let’s Encrypt On Debian 11.
Now we have learned how to install Zabbix on Debian 11, for more information feel free to contact us.