In this tutorial you will learn how to Install LAMP and Let’s Encrypt SSL on Debian 11.
LAMP is short for Linux, Apache, MySQL, PHP. Its a term used when we are building a standard web server which is includes the operating system, the web server software, the database software and the server side scripting language to pull it all together.
Let’s Encrypt is a free service that allows us to secure our websites with an SSL, this encrypts the traffic from the server, to your web browser. Traditionally we would need to buy an SSL certificate from a 3rd party such as Comodo, this requires creating a certificate request, sending it to Comodo to be signed, then installing the certificate they provide. This can be time consuming. Let’s Encrypt allows us to do this on the server automatically, more importantly its free.
It always seems impossible until its done.The future belongs to those who believe in the beauty of their dreams.
Eleanor Roosevelt
Requirements
- You will need a Server from a reliable provider like Sebae
- Your Server should be the latest Debian release, currently 11
- You will need root access to the server
Like most Operating Systems, they should be kept up to date. We have created an article that shows how to keep your Debian release up to date, leaving you do to other things.
You can follow our tutorial on how to keep Debian automatically updated.
Before You Begin
Login to your VPS as root, and get the OS up to date.
apt update && apt upgradelet the process run, once finished Debian should be ready.
Step 1: Install LAMP On Debian 11
First of all, we need to download and install our LAMP stack on Debian. To do this run the following command:
apt-get install apache2 mariadb-server php php-cli php-common libapache2-mod-php wget -yNext run the following commands to enable the services so they start at reboot, note this should be already done automatically as part of the install.
systemctl start apache2
systemctl enable apache2
systemctl start mariadb
systemctl enable mariadb
Once complete, we can verify Apache is running with the following command;
systemctl status apache2The output should be similar as below
root@debtraining:~# systemctl status apache2
* apache2.service - The Apache HTTP Server
   Loaded: loaded (/lib/systemd/system/apache2.service; enabled; vendor preset: enabled)
   Active: active (running) since Tue 2021-10-26 20:47:21 UTC; 42s ago
     Docs: https://httpd.apache.org/docs/2.4/
 Main PID: 12485 (apache2)
    Tasks: 55 (limit: 38054)
   Memory: 4.9M
      CPU: 48ms
   CGroup: /system.slice/apache2.service
           |-12485 /usr/sbin/apache2 -k start
           |-12486 /usr/sbin/apache2 -k start
           `-12487 /usr/sbin/apache2 -k start

Oct 26 20:47:21 debtraining systemd[1]: Starting The Apache HTTP Server...
Oct 26 20:47:21 debtraining systemd[1]: Started The Apache HTTP Server.
You can also verfiy Apache is accessible by entering the URL of your server like this:
http://IP_Server_Address
If everything is looking like the above then we now have Apache & MariaDB installed and running.
Step 2: Create A New Apache Virtual Host
Now we need to create a virtual host which is essentially another website running on the same server.
To create it run the following command:
nano /etc/apache2/sites-available/blog.mydomain.com.conf Add the following lines to the file:
 <VirtualHost *:80>
        ServerName blog.mydomain.com
        ServerAdmin info@mydomain.com
        DocumentRoot /var/www/html
        ErrorLog ${APACHE_LOG_DIR}/error.log
        CustomLog ${APACHE_LOG_DIR}/access.log combined
 </VirtualHost>
Now save and close the files.
Next, lets enable the new Apache virtual host by running the following command:
a2ensite blog.mydomain.com.conf Now the new Apache virtual host is active.
Step 3: Installing Let’s Encrypt On Debian 11
Now we have LAMP installed, the next step is to install Let’s Encrypt. To do this we first need to install the Certbot tool.
Run the following command to install the package:
apt -y install certbot python3-certbot-apacheNow we can run the tool to get Let’s Encrypt certifificates. Please note, you must have a valid domain for this to work.
The server must also be contactable from the internet on ports 80 and 443, if not the process will fail.
Lets get our certificate by running the following command:
certbot --apache -d mydomain.com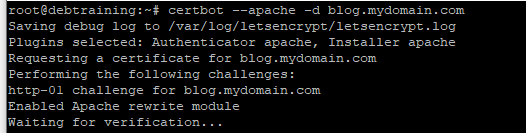
When you first run the command, the wizard will ask you to agree to the licence agreement and ask you to provide an email address.
Next the wizard will run the http challange request and obtain the Let’s Encrypt certificate.
The wizard will also ask if you wish to configure https redirection, simply accept this by entering number 2 and the wizard will redirect all traffic on port 80 to 443 (SSL). This is the correct way to setup SSL.
Now your website is secured with an SSL certificate.
Step 3: Check Let’s Encrypt Automatic Renewal
The Let’s Encrpt certifcates have a defaut life time of 3 months and the certbot’s automated renewal process is configured to renew when there is less than 30 days remaining.
To check the timer is running, run the following command:
systemctl status certbot.timerThe output should look like this

Finally we can test a dry run of the renewal process by running the following command:
certbot renew --dry-runThe installation is now complete and your site is now secured by an SSL.
If your running a highly secure website, such as passing sensitive customer data then we still recommend you purchase a 3rd party SSL certificate. Although Let’s Encrypt is free to use, the short life time can potentially leave your site insecure if the automatic renewal process fails to renew.
Now we have learned how to install LAMP and Let’s Encrypt SSL on Debian 11.
If you would like further help you can get in touch with us.