In this article today, we are going to show you how to install XEN dom0 on Debian 12 from source, this will also work on Debian 11. XEN is a widely used hypervisor and has been around for many years. It has evolved to be a popular choice for server virtualisation and lowering the total cost of ownership.
XEN is a great choice if you are looking to virtualise your infrastructure, or you are looking to simply setup a home lab.
Whilst you can install XEN from Debian packages, often the case these packages are behind in versions. To get the latest releases and keep up to date we will focus on compiling XEN from source.
The future belongs to those who believe in the beauty of their dreams.
Eleanor Roosevelt
Requirements
- A server setup with Debian 12 (fresh install recommended)
- Access to the internet
- You will need root access to the server
- The server should be a physical host, you can order one from Sebae
- SSH enabled on the server
Keeping your server up to date with releases and patches is highly recommended. As technology changes, so does the requirements to keep those changes secure. Running a virtualised environment puts the main hypervisor in the spotlight for attacks. We strongly advise to keep the hypervisor from being accessible from the internet and limit any access to virtual machines by firewalls.
You can follow our tutorial on how to keep Debian automatically updated.
The walk through of this guide can be followed in the following video.
Before You Begin
Login to your server as root and get the OS up to date.
apt update && apt upgradelet the process run, once finished Debian should be ready.
For our partition layout, we are using the following
/boot Ext4 - 500MB
/ Ext4 - 200GB
/swap - 2GB
LVM Volume for guests - 500GB
You do not need to follow our partition sizes, you can customise the partitions based your server specifications and requirements.
Step 1: Install Required Packages
First of all, in order to successfully compile the kernel and XEN, we will need to install the build packages. From the shell, run the following command:
apt-get install bc bcc bin86 gawk bridge-utils iproute2 libcurl4 libcurl4-openssl-dev bzip2 kmod fig2dev texinfo texlive-latex-base gcc-multilib texlive-fonts-extra texlive-fonts-recommended libpci-dev mercurial libncurses5-dev patch libvncserver-dev libsdl1.2-dev gettext libaio1 libaio-dev libssl-dev acpica-tools libbz2-dev git uuid-dev python-is-python3 python-dev-is-python3 python3-twisted build-essential make gcc libc6-dev zlib1g-dev texlive-latex-recommended libext2fs-dev libyajl-dev libpixman-1-dev liblzma-dev flex bison ninja-build libelf-devDuring the install process, apt will prompt to continue, if you are happy please enter ‘Y‘
Step 2: Download And Compile XEN
Now we have all the packages installed, we can download the latest build of XEN and compile it. The XEN installation will be using bridge mode.
Let change into the source build directory by running the following command:
cd /usr/srcNow download XEN by running the following command:
wget https://downloads.xenproject.org/release/xen/4.19.1/xen-4.19.1.tar.gzNow extract the tar file:
tar xvf xen-4.19.1.tar.gzChange into the new XEN directory:
cd xen-4.19.1Now let’s configure the source files by running the following command:
./configure -enable-githttp -libdir=/usr/libOnce complete, we can now build the source, this may take some time.
make -j 5 xen && make -j 5 tools && make -j 5 stubdomLet’s install the newly compiled binaries, firstly change to the install directory with the following command:
cd dist/installNow we can copy the binaries into the appropriate directories.
Note ignore the error ‘cannot overwrite non-directory ‘/var/run’ with directory ‘var/run’
cp -R * /Edit the following file with your favorite editor, we will be using vi
vi /etc/default/xendomainsFind and comment out the following line then save the changes.
#XENDOMAINS_SAVE=/var/lib/xen/saveXen is now compiled and installed.
Step 3: System Tweaks
The following tweaks should make XEN start when the system boots up. These are optional but recommended. These tweaks will also add more scheduling weight to dom0 and disable power save on the console (useful if you get system crashes).
Note, the following entries that contain rc.5 could be rc.3 depending on your runlevel. We are running runlevel 5 so the following will reflect that. To find out what runlevel you are in, simply enter runlevel at the prompt.
root@debiantraining:/usr/src/xen-4.19.1/dist/install# runlevel
N 5
Now enter the following commands:
ln -s /etc/init.d/xendomains /etc/rc0.d/S10xendomains
ln -s /etc/init.d/xendomains /etc/rc6.d/S10xendomains
ln -s /etc/init.d/xencommons /etc/rc5.d/S98xencommons
ln -s /etc/init.d/xendomains /etc/rc5.d/S98xendomains
ln -s /etc/xendom0caps /etc/rc5.d/S98xendom0caps
echo "xl sched-credit -d Domain-0 -w 512" > /etc/xendom0caps
chmod +x /etc/xendom0caps
echo "/usr/bin/setterm -powersave off -blank 0" > /etc/rc.local
Finally lets also disable ballooning, this can save RAM but with a performance impact. If you have a fast CPU then you may choose to ignore this:
vi /etc/xen/xl.confnow change the following line from 1 to 0
autoballoon=0Step 4: Configure Network Interfaces
Newer releases of XEN can now use the system bridge rather than in previously releases where XEN provided their own script. In order to do this, we need to edit the network configuration to invoke our new bridge.
Caution is advised in the next step as this could lead to no network connectivity if the steps are not correctly followed.
Firstly, we will create a new bridge interface by editing the following file:
vi /etc/network/interfacesNow edit the file to look like the following
NOTE change the IP, bridge_port and hotplug values to what you are already using!
# This file describes the network interfaces available on your system
# and how to activate them. For more information, see interfaces(5).

source /etc/network/interfaces.d/*

# The loopback network interface
auto lo
iface lo inet loopback

# The primary network interface
allow-hotplug enp9s0

auto xenbr0
iface xenbr0 inet static
bridge_ports enp9s0
address 192.168.0.199
netmask 255.255.255.0
network 192.168.0.0
broadcast 192.168.0.255
gateway 192.168.0.1
Once you have done editing the file, save and reboot to make sure the network comes back up.
If done correctly, you should now see your new bridge by running the following command:
ip aThe output should look like the following:
1: lo: <LOOPBACK,UP,LOWER_UP> mtu 65536 qdisc noqueue state UNKNOWN group default qlen 1000
    link/loopback 00:00:00:00:00:00 brd 00:00:00:00:00:00
    inet 127.0.0.1/8 scope host lo
       valid_lft forever preferred_lft forever
    inet6 ::1/128 scope host
       valid_lft forever preferred_lft forever
2: enp9s0: <BROADCAST,MULTICAST,UP,LOWER_UP> mtu 1500 qdisc mq master xenbr0 state UP group default qlen 1000
    link/ether 00:21:70:6d:f3:0b brd ff:ff:ff:ff:ff:ff
3: xenbr0: <BROADCAST,MULTICAST,UP,LOWER_UP> mtu 1500 qdisc noqueue state UP group default qlen 1000
    link/ether 62:34:cd:0e:99:de brd ff:ff:ff:ff:ff:ff
    inet 192.168.0.199/24 brd 192.168.0.255 scope global xenbr0
       valid_lft forever preferred_lft forever
    inet6 fe80::6034:cdff:fe0e:99de/64 scope link
       valid_lft forever preferred_lft forever
At this point if you need a coffee, now is the time 🙂
Step 5: Compile The XEN Kernel
Now we have completed the XEN steps, we need to install a XEN enabled kernel. The XEN aware kernel contains the necessary drivers and options we need but is not enabled by default. This will also allow us to run more up to date kernels than the standard images shipped with Debian.
Important – If you are using SCSI controllers or RAID cards, please ensure you have those selected during the menu selections, otherwise your system may not boot.
Let’s change back to the source directory;
cd /usr/srcNow let’s get the latest kernel release
wget https://cdn.kernel.org/pub/linux/kernel/v6.x/linux-6.12.5.tar.gzExtract the tar file:
tar xvf linux-6.12.5.tar.gzNow let’s change into the kernel directory:
cd linux-6.12.5Optional: you can use your existing kernel config which is useful for keeping existing drivers enabled, saving you time choosing these in the kernel menu. This is recommended as your system may not boot if there are missing settings such as SCSI and dev mapper support.
To do this firstly run;
make oldconfigWhen the prompts appear, you can for the best part keep pressing enter until finish but you may change the settings if you wish.
Now we will choose what to compile in the Linux kernel menu. Enter the following command:
make menuconfigOnce loaded, you should be presented with a text-based menu.
Go into the Processor type and features menu:
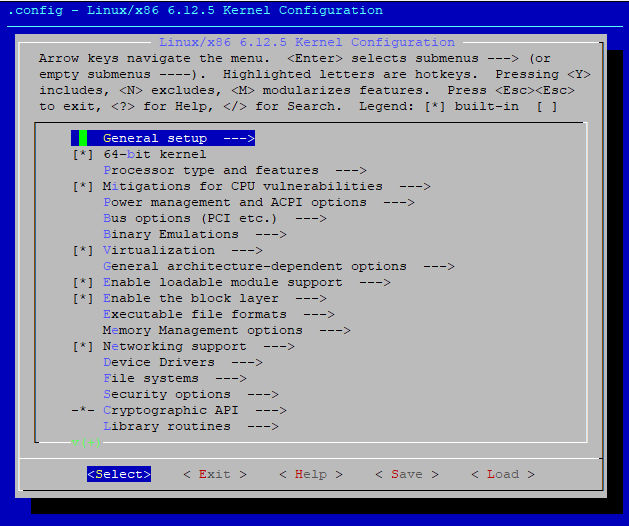
Then choose Linux guest support – all the options related to XEN should have an asterisk * next to them already, if not change it so they all have an asterisk. You can enable debug if you wish to do so.
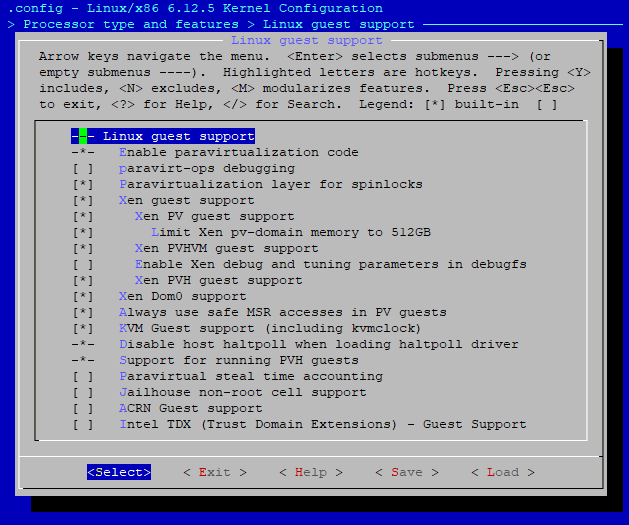
Now go back to the main menu by selecting exit, then exit again.
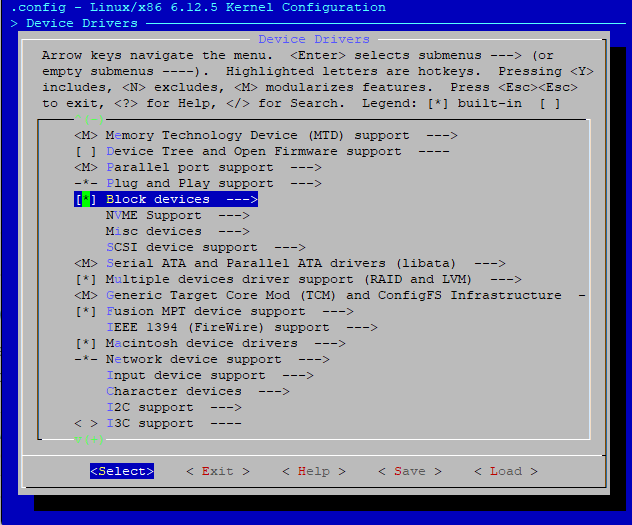
Now scroll down to Device Drivers and press enter
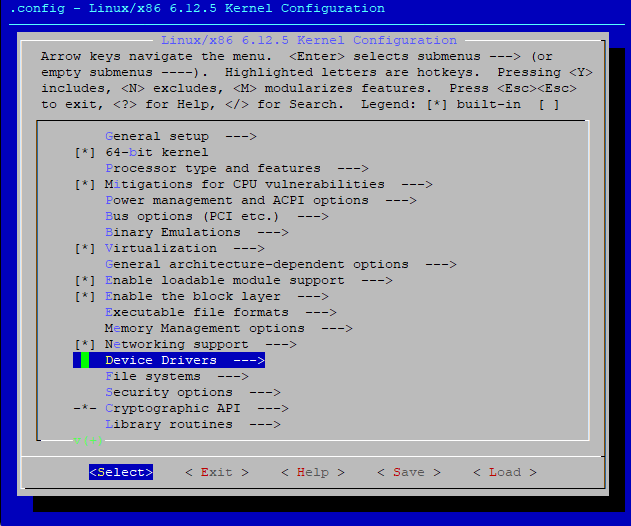
Next go down to XEN driver support and press enter
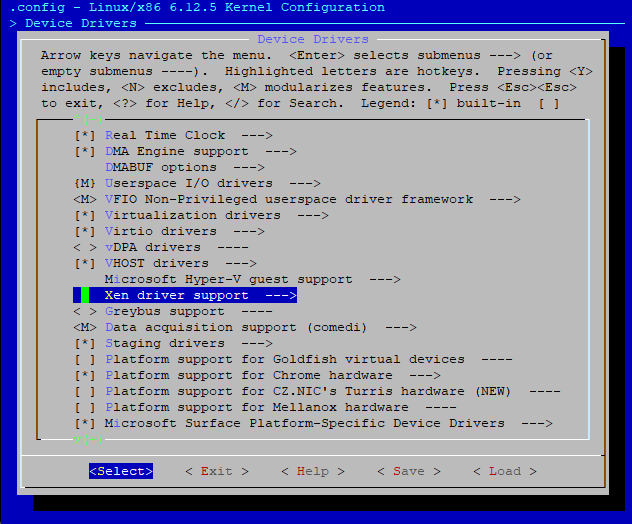
Most options should be either set to static (*) or module (M) if not you can change them all to static.
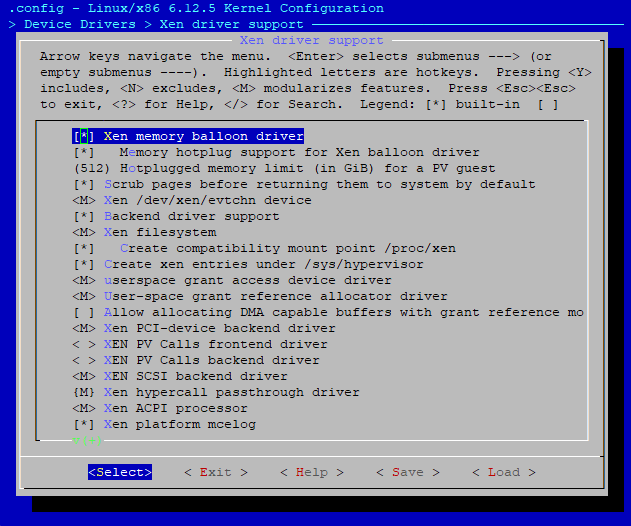
Now press Exit to get back to the Device Drivers menu.
Now go into the block devices menu
Make sure the 2 XEN options are set like below
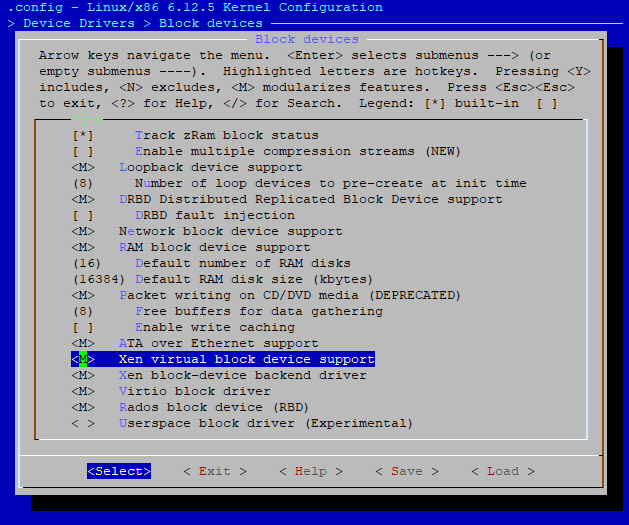
Now go back to the Devices Menu by pressing Exit.
Go down to the Network device support menu and press enter
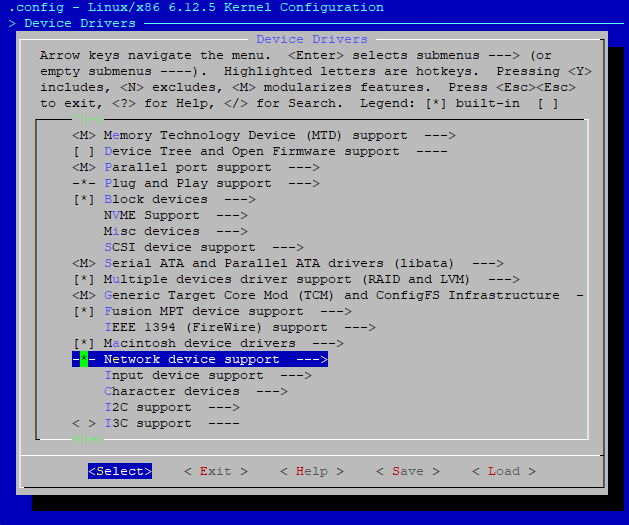
ensure the 2 XEN options are set statically (*) or set as a module (M)
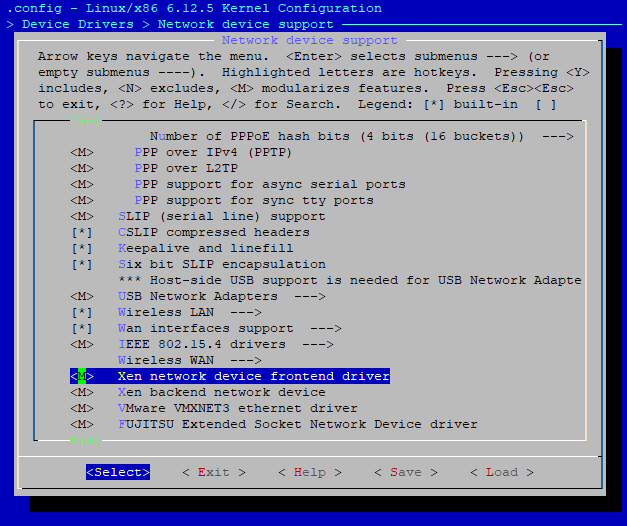
Thats it, we can now exit the kernel menu by selecting Exit 3 times.
Make sure to press yes to saving the changes
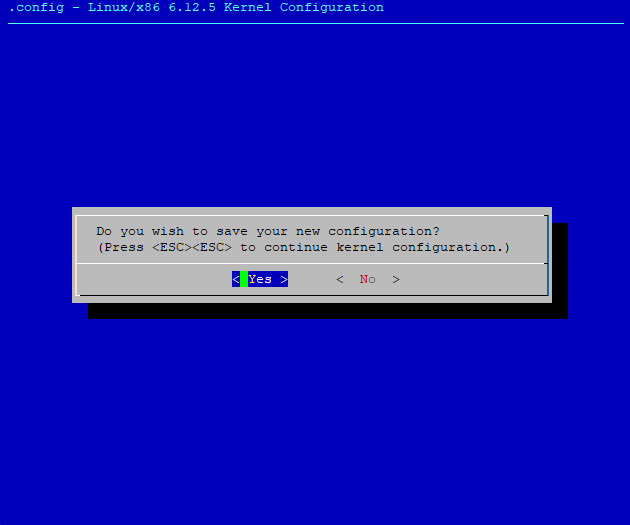
Note run the following command after you have saved the config to avoid a certificate error when compiling;
sed -ri '/CONFIG_SYSTEM_TRUSTED_KEYS/s/=.+/=""/g' .configWe can verify our saved options by running the following command:
cat /usr/src/linux-6.12.5/.config | grep XENThe output should look like the following;
CONFIG_XEN=y
CONFIG_XEN_PV=y
CONFIG_XEN_512GB=y
CONFIG_XEN_PV_SMP=y
CONFIG_XEN_PV_DOM0=y
CONFIG_XEN_PVHVM=y
CONFIG_XEN_PVHVM_SMP=y
CONFIG_XEN_PVHVM_GUEST=y
CONFIG_XEN_SAVE_RESTORE=y
# CONFIG_XEN_DEBUG_FS is not set
CONFIG_XEN_PVH=y
CONFIG_XEN_DOM0=y
CONFIG_XEN_PV_MSR_SAFE=y
CONFIG_PCI_XEN=y
# CONFIG_KVM_XEN is not set
CONFIG_NET_9P_XEN=m
CONFIG_XEN_PCIDEV_FRONTEND=m
CONFIG_XEN_BLKDEV_FRONTEND=m
CONFIG_XEN_BLKDEV_BACKEND=m
CONFIG_XEN_SCSI_FRONTEND=m
CONFIG_NETXEN_NIC=m
CONFIG_XEN_NETDEV_FRONTEND=m
CONFIG_XEN_NETDEV_BACKEND=m
CONFIG_INPUT_XEN_KBDDEV_FRONTEND=y
CONFIG_HVC_XEN=y
CONFIG_HVC_XEN_FRONTEND=y
CONFIG_TCG_XEN=m
CONFIG_XEN_WDT=m
CONFIG_DRM_XEN=y
CONFIG_DRM_XEN_FRONTEND=m
CONFIG_XEN_FBDEV_FRONTEND=y
CONFIG_SND_XEN_FRONTEND=m
# CONFIG_USB_XEN_HCD is not set
CONFIG_XEN_BALLOON=y
CONFIG_XEN_BALLOON_MEMORY_HOTPLUG=y
CONFIG_XEN_MEMORY_HOTPLUG_LIMIT=512
CONFIG_XEN_SCRUB_PAGES_DEFAULT=y
CONFIG_XEN_DEV_EVTCHN=m
CONFIG_XEN_BACKEND=y
CONFIG_XENFS=m
CONFIG_XEN_COMPAT_XENFS=y
CONFIG_XEN_SYS_HYPERVISOR=y
CONFIG_XEN_XENBUS_FRONTEND=y
CONFIG_XEN_GNTDEV=m
CONFIG_XEN_GRANT_DEV_ALLOC=m
# CONFIG_XEN_GRANT_DMA_ALLOC is not set
CONFIG_SWIOTLB_XEN=y
CONFIG_XEN_PCI_STUB=y
CONFIG_XEN_PCIDEV_BACKEND=m
CONFIG_XEN_PVCALLS_FRONTEND=m
CONFIG_XEN_PVCALLS_BACKEND=m
CONFIG_XEN_SCSI_BACKEND=m
CONFIG_XEN_PRIVCMD=m
CONFIG_XEN_PRIVCMD_EVENTFD=y
CONFIG_XEN_ACPI_PROCESSOR=m
CONFIG_XEN_MCE_LOG=y
CONFIG_XEN_HAVE_PVMMU=y
CONFIG_XEN_EFI=y
CONFIG_XEN_AUTO_XLATE=y
CONFIG_XEN_ACPI=y
CONFIG_XEN_SYMS=y
CONFIG_XEN_HAVE_VPMU=y
CONFIG_XEN_FRONT_PGDIR_SHBUF=m
CONFIG_XEN_UNPOPULATED_ALLOC=y
CONFIG_XEN_GRANT_DMA_OPS=y
CONFIG_XEN_VIRTIO=y
# CONFIG_XEN_VIRTIO_FORCE_GRANT is not set
Now we can start compiling the kernel with the XEN options included.
Run the following command to start compiling:
make -j 5 bzImage && make -j 5 modules && make -j 5 INSTALL_MOD_STRIP=1 modules_installOnce complete, we can then copy the kernel files into the correct directories by running the following commands;
cp -a arch/x86/boot/bzImage /boot/vmlinuz-6.12.5
cp -a System.map /boot/System.map-6.12.5
cp -a .config /boot/config-6.12.5
depmod -a
mkinitramfs -o /boot/initrd.img-6.12.5 6.12.5
Step 6: Configure Grub to boot XEN
We have reached the last part of the build. We now need to tell grub to boot in XEN mode and here we can also specify the RAM allocation to dom0.
change into the grub directory:
cd /etc/grub.dWe now need to move the normal Linux kernel to a lower priority so Grub boots XEN, run the following command:
mv 10_linux 50_linuxNext edit the grub file
vi /etc/default/grubNow we need to add the following lines under the GRUB_CMDLINE_Linux section.
You can also edit the RAM allocation, here we have it set to 1GB.
GRUB_CMDLINE_XEN_DEFAULT=dom0_mem=1024M,max:1024M
GRUB_CMDLINE_XEN=
The lines should look like this
GRUB_DEFAULT=0
GRUB_TIMEOUT=5
GRUB_DISTRIBUTOR=`lsb_release -i -s 2> /dev/null || echo Debian`
GRUB_CMDLINE_LINUX_DEFAULT="quiet"
GRUB_CMDLINE_LINUX=""
GRUB_CMDLINE_XEN_DEFAULT=dom0_mem=1024M,max:1024M
GRUB_CMDLINE_XEN=
save and exit
Next issue the following command:
update-grubNow reboot and you should be able to issue the following command once you have logged back in;
xl listYou should get the following output:
Name                                        ID   Mem VCPUs      State   Time(s)
Domain-0                                     0  1024     2     r-----      16.7
root@debiantraining:~#
You can now create your guest VM disks and config files, please refer to the XEN Project Wiki which contains useful information on settings these up.
Now you have learned how to install XEN dom0 on Debian from source.
We hope you found this useful, for any further help or interest in our products, you can contact us via our website.


